Naztronomy

How to Start NINA and Start Imaging When Your PC Turns On

By Naztronomy • Posted on 9/30/2026 • Updated on 10/1/2026

The above is a more in-depth video on how to start NINA on startup!

Before we get started with the scheduler, we need to collect some information. First start N.I.N.A. and go to Options followed by General if you are not already there.

Look at your profiles and find the profile you want to target. For example, mine is named 91F SKyEye6200. I want to grab that ID. I can either look at it and write it down, or find it in my path as follows.
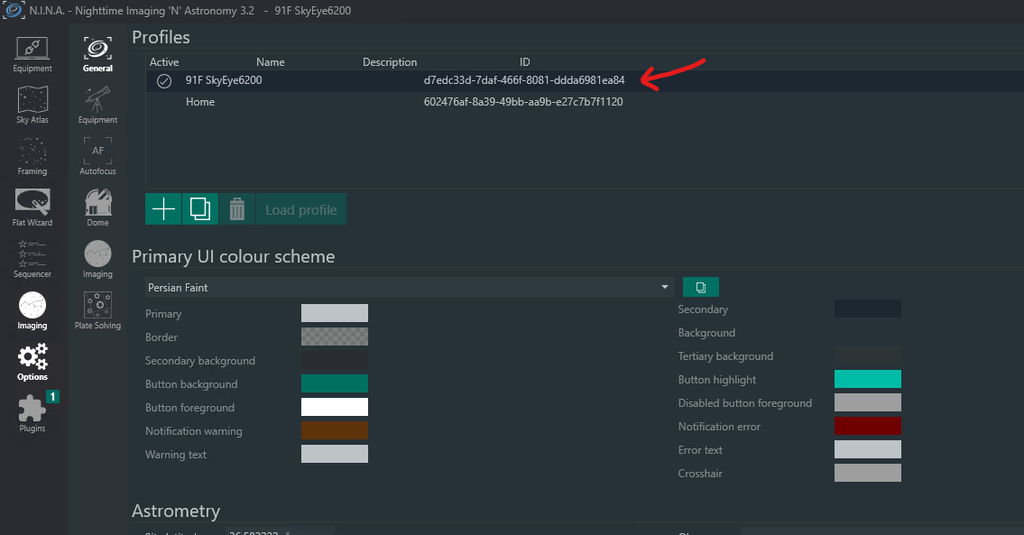
NINA Screenshot of Options >> General

Open your file explorer and in your address bar type: %LOCALAPPDATA%\NINA\Profiles
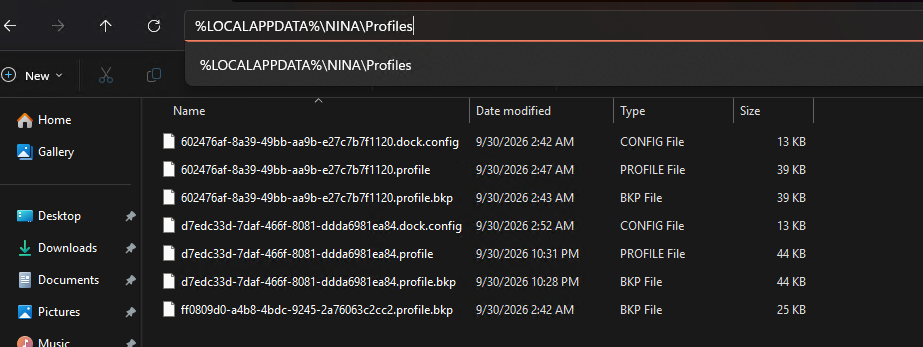
Once you hit enter, you should be taken to your local profile’s C: drive’s Local AppData location, straight into your NINA Profile’s folder. Now find t he profile ID that matches what you want ot target in NINA, for me it’s d7edc33d-7daf-466f-8081-ddda6981ea84.

You can try to rename it so that you can copy the file name, paste that in a notepad somewhere:
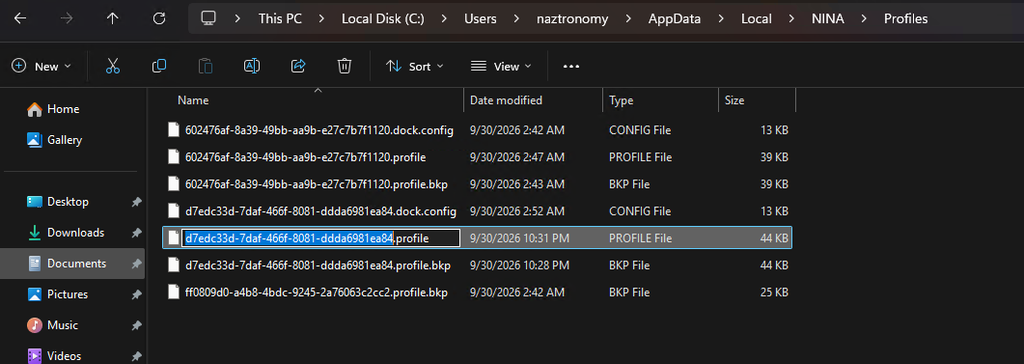
Next we’ll need our NINA sequencer file. This tutorial assumes you already have your sequencer saved somewhere. For me, it’s in my Documents >> N.I.N.A. directory. It has a list of my sequencers that end in .json. For me it’s an unsavory file named Naztronomy_Auto_Target_Scheduler_w_roof_switches_night_Summary_V2.json.

Right click on that file and click Copy As Path:
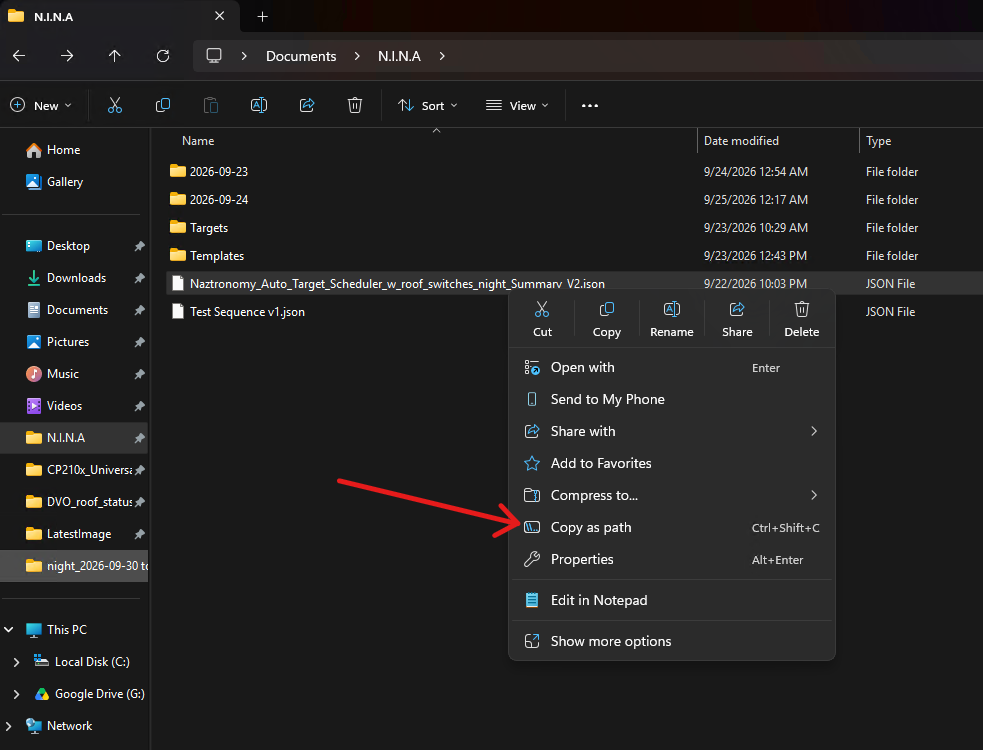
And save that in a Notepad. Mine looks like this: "C:\Users\naztronomy\Documents\N.I.N.A\Naztronomy_Auto_Target_Scheduler_w_roof_switches_night_Summary_V2.json"

Where ever you have both texts saved, add a profile and sequence flag and put it all on one line like this:
-p d7edc33d-7daf-466f-8081-ddda6981ea84 -s "C:\Users\naztronomy\Documents\N.I.N.A\Naztronomy_Auto_Target_Scheduler_w_roof_switches_night_Summary_V2.json" -r

The -p tag says it’s a profile id and the -s says it’s a sequence file and the -r tells NINA to run the sequence.

Now let’s schedule this thing. In the search bar at the bottom, search for Task Scheduler and run it:
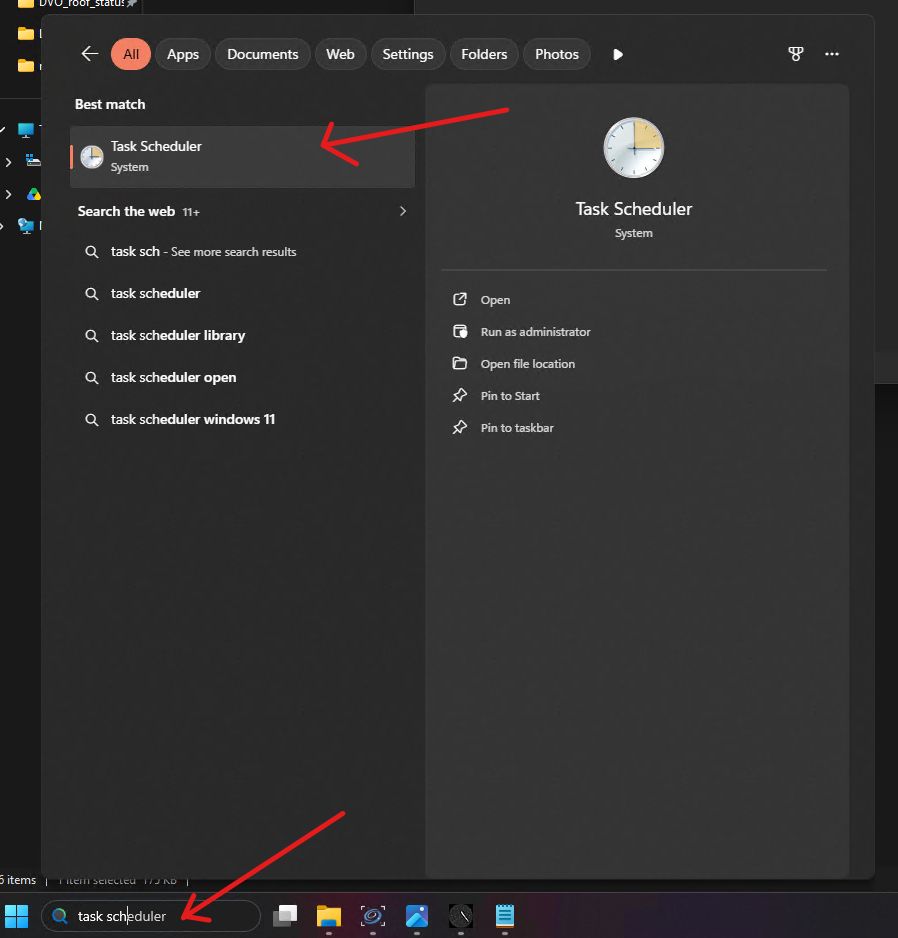
Click on Task Scheduler Library on the left and then Create Task on the right:
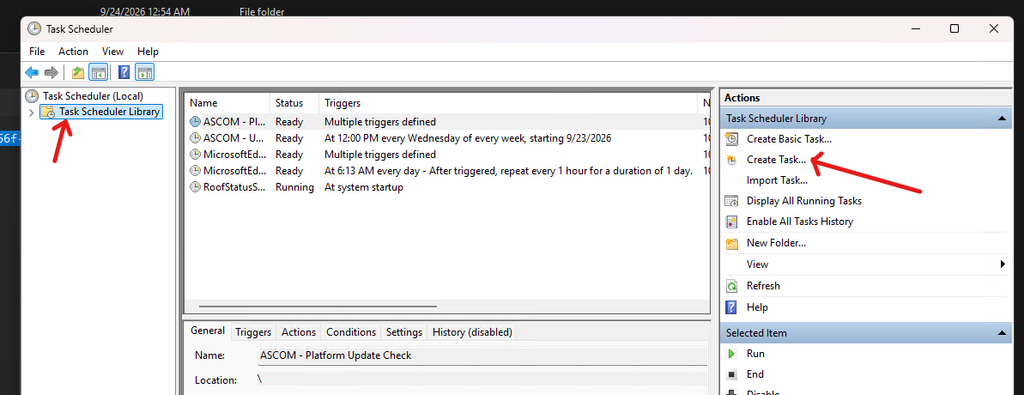
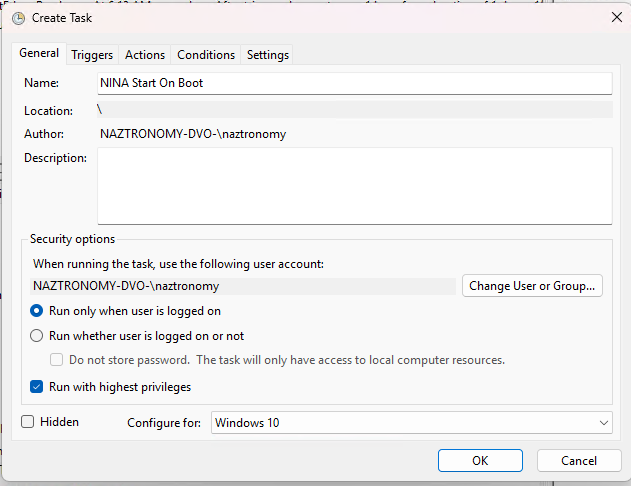
In the General tab, give it any name you wish. I picked NINA Start On Boot. In the security options below, you can leave it as default and this tutorial assumes that your computer will log you into your mini PC on boot (without a password). Check Run with highest privileges and then at the bottom, select Configure for Windows 10.
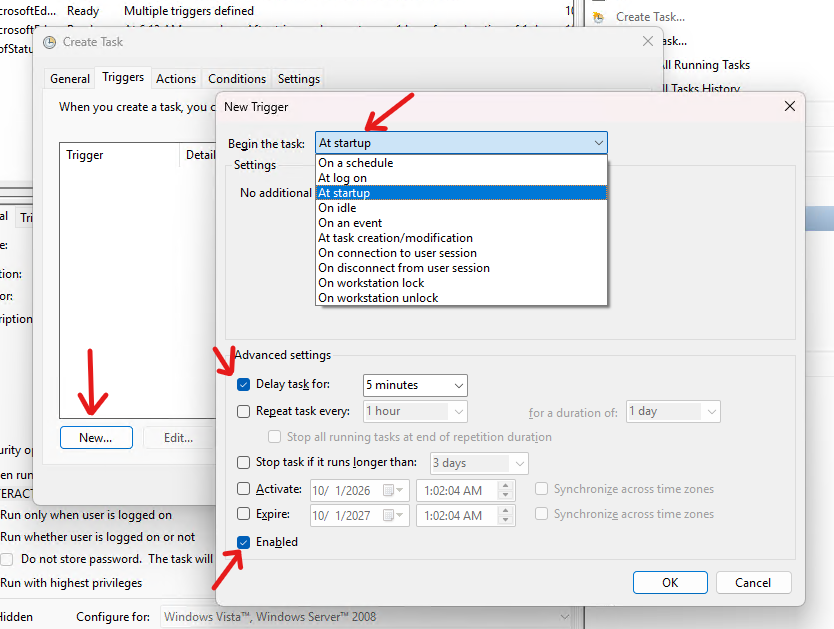
Then in the Triggers tab, click New at the bottom left, and set the Begin The Task to At Startup. In the Advanced settings, I recommend doing a delay of around 5 minutes to allow drivers and other software to start up at the beginning. Otherwise NINA may start too early. And of course at the very bottom, make sure you click Enabled. Then click OK.
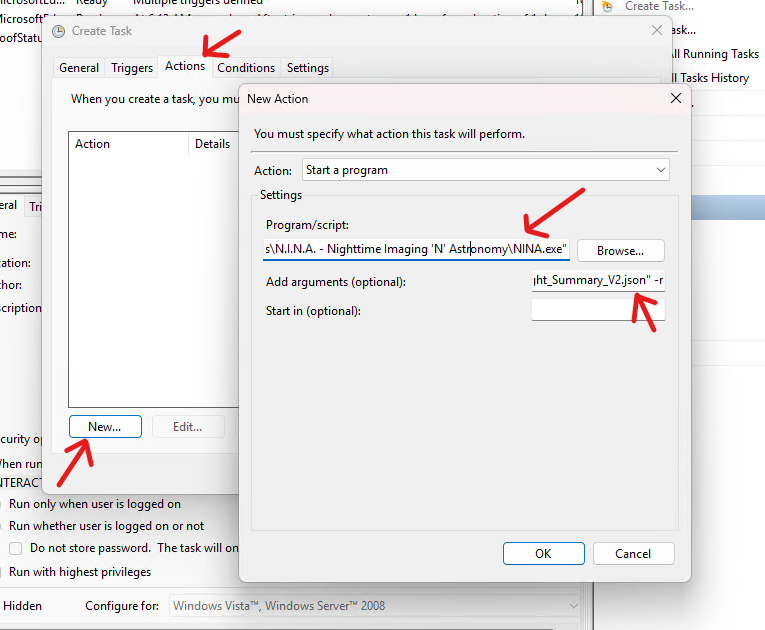
Then in the Actions tab, click New at the bottom left, keep the Action as Start a Program. Then in the Program/Script section, click Browse and find your NINA.exe which should be located in your Program Files area. Mine is located here: "C:\Program Files\N.I.N.A. - Nighttime Imaging 'N' Astronomy\NINA.exe"

Make sure the double quotes are there. In the Add Arguments (optional) section, copy/paste the string you put together earlier. Mine is: -p d7edc33d-7daf-466f-8081-ddda6981ea84 -s "C:\Users\naztronomy\Documents\N.I.N.A\Naztronomy_Auto_Target_Scheduler_w_roof_switches_night_Summary_V2.json" -r

Then click OK.
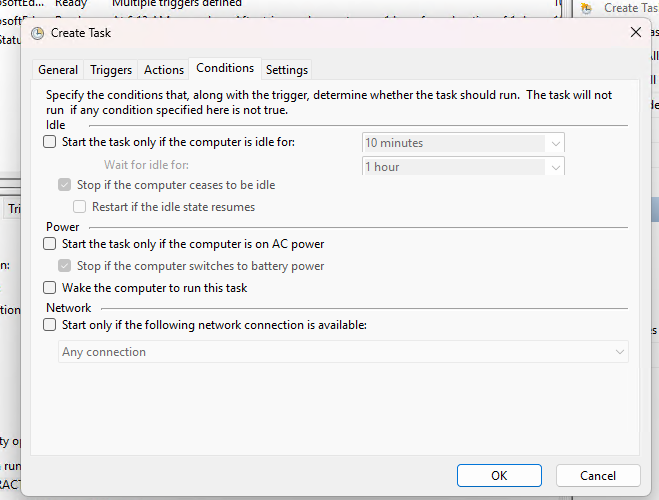
In the Conditions tab, unchck everything:
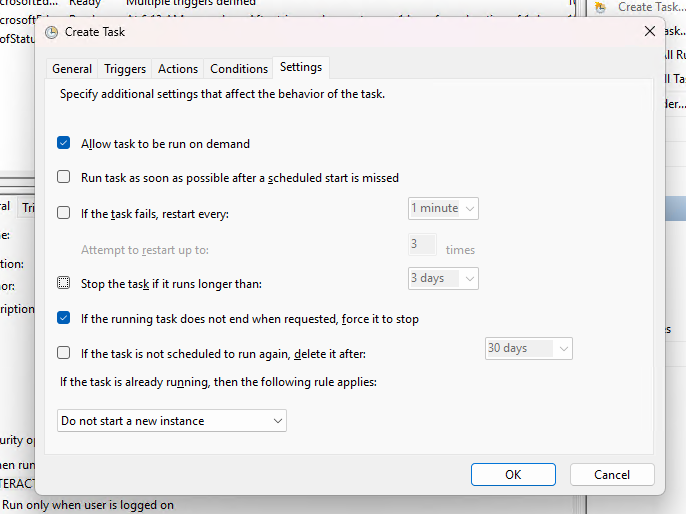
And finally, in the Settings tab, only check Allow task to be run on demand and If the running task does not end when requested, force it to stop. Make sure the bottom option stays at Do not start a new instance. And then click OK.
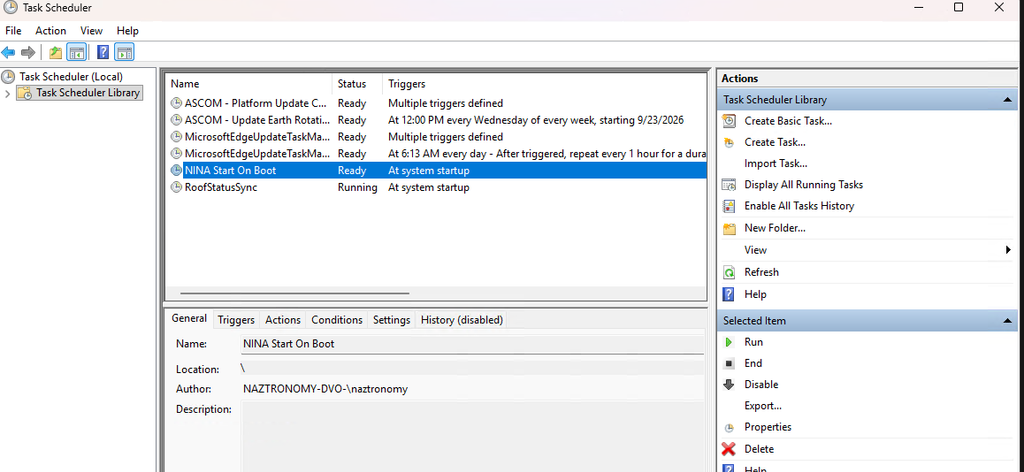
This new task should show up in your list and should say At system startup. To test this, you can either click Run in the right-side bar OR restart your computer and see if it runs.
If it runs, NINA should turn on 5 minutes after your PC is booted and go straight into your sequence. I recommend making sure you run your sequence once first manually, then close NINA because then the settings will get remembered.

Questions or comments? Let me know!
Monochrome Mosaic Stacking Made Easy with this New Siril Script

By Naztronomy • Posted on 7/21/2026

Ever wanted to stack monochrome images easily? What about monochrome mosaics? Well look no further than this script. This is the Naztronomy Mono PP script in Siril and it does wonders. Check out the video for more info.

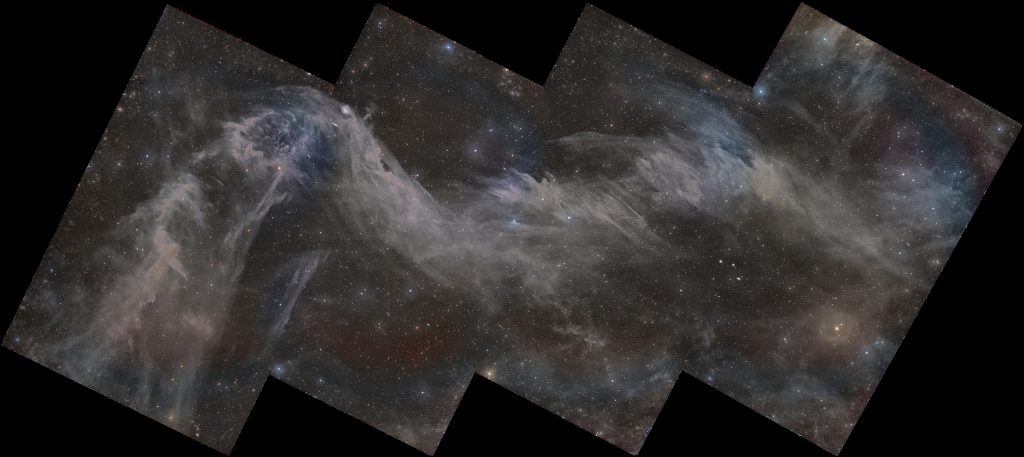
This is the final result as seen in the thumbnail, although I use sessions of M8 and M20 for the actual demo:

This is the Mandel-Wilson 9 nebula, which I'm calling the Cosmic Snake. Amazing nebula seen from the Southern Hemisphere. The Rig had a lot of servere light leaks but I made the best of it. I highly recommend looking at it on Astrobin because you can zoom in to see the tiny galaxies: https://app.astrobin.com/i/qbbxwm The jagged mosaic panels were also a mistake on my part, I forgot to reset the angles when creating the mosaic sequence in NINA but I think it looks kinda cool, it kinda goes with the body of the snake.
Telescope: Sky-Watcher Esprit 100ED
Camera: QHY268M
Mount: Sky-Watcher EQ8-R Pro
Filters: ZWO LRGB
Exposure: L: 122x180s, R: 99x180s, G: 113x180s, B: 100x180s
Integration: 22 hours 42 minutes
Guiding: OAG
Software: Siril, NINA, PixInsight, PHD2
Location: Bortle 1, Kagga Kamma Remote Observatory, South Africa
Date: April-May 2026

My Adventure Chasing the Milky Way in Acadia National Park

By Naztronomy • Posted on 7/17/2026 • Updated on 7/18/2026

We had a blast last weekend! Three nights of clear skies meant I got a lot of images of the Milky Way Galaxy. The video shows you what I saw from my point of view.

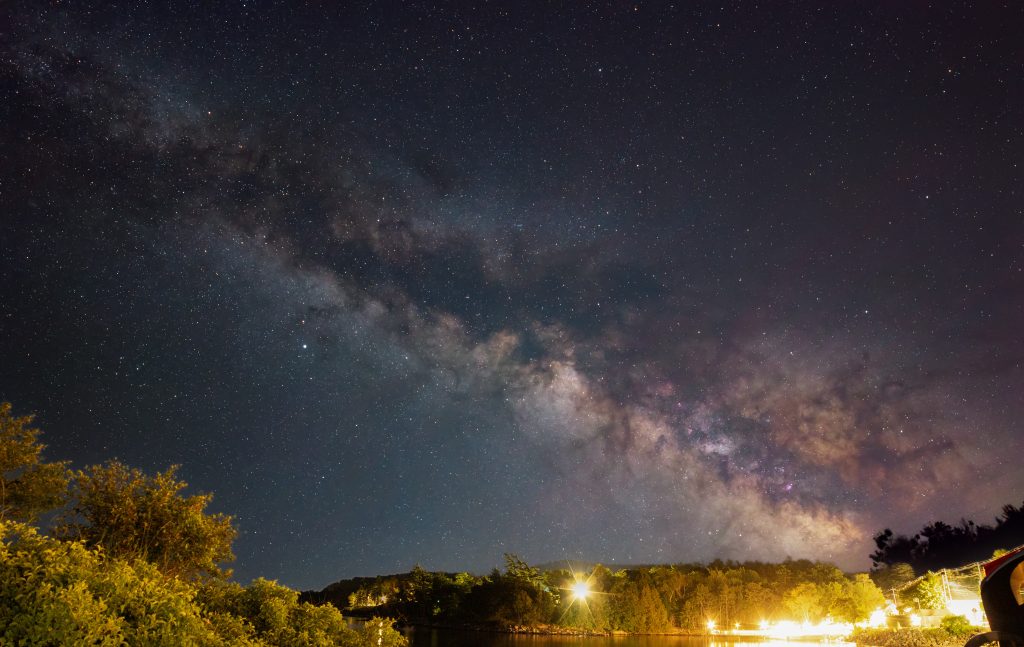
Here’s the final product again:

Taken from Acaidia National Park the weekend of July 10, 2026, this is a composite of the foreground near Bar Harbor, Maine and a shot of the milky way from a nearby beach.
Camera: Canon T5i, Lens; Samyang 14mm, Integration: 72x30s

As mentioned in the video, the above is a composite. I will work on a video showing how to create such an image.

How to Implement a N.I.N.A. Roof Status Safety Monitor at a Remote Observatory (DVO)

By Naztronomy • Posted on 7/15/2026 • Updated on 7/16/2026

Although this video is Death Valley Observatories specific, the scripts can be modified to work at any remote observatory. The steps on installing the ASCOM Safety Monitor driver and configuring that is still relevant for all observatories.

The steps highlighted below can be fo und at the following google doc: https://docs.google.com/document/d/19BITAbEjY_L6WSasDpdEkB5NZAB4cNiRr5cnhWt0dpU/edit?tab=t.0

Step 1: Download ASCOM Generic File SafetyMonitor Driver

Go to https://www.dehilster.info/astronomy/ascom_generic_file_safetymonitor.php and download the .zip as shown in the screenshot below

Step 2:  Right click and Extract the contents:

Step 3: Go into the extracted dir and install the driver

Step 4 (DVO Specific): Download the roof status zip file with the powershell and batch scripts: https://drive.google.com/file/d/1n5XWq_V_JHWiG2OEs8XTBL4XqenYMQQ5/view?usp=drive_link

Step 5 (DVO Specific): Go to the location where you saved it (e.g C:\Users\Naz\Documents\roof), right click and extract and go into that directory:

Step 6 (DVO Specific): Right click on the roof_status_set.bat file and click “Run as administrator”

Step 7 (DVO Specific): It runs under the “SYSTEM” user so you should get a screen that says something like this with a few success messages and “Press any key to continue…” (press any key):

Step 8 (DVO Specific): To verify installation, go to Start >> search for “Task Scheduler “ and look for “RoofStatusSync” in in the list and see if it’s running:

Step 9 (DVO Specific): Go back to the directory where the powershell and batch scripts are and you should see a new “roofstatus.txt” file:

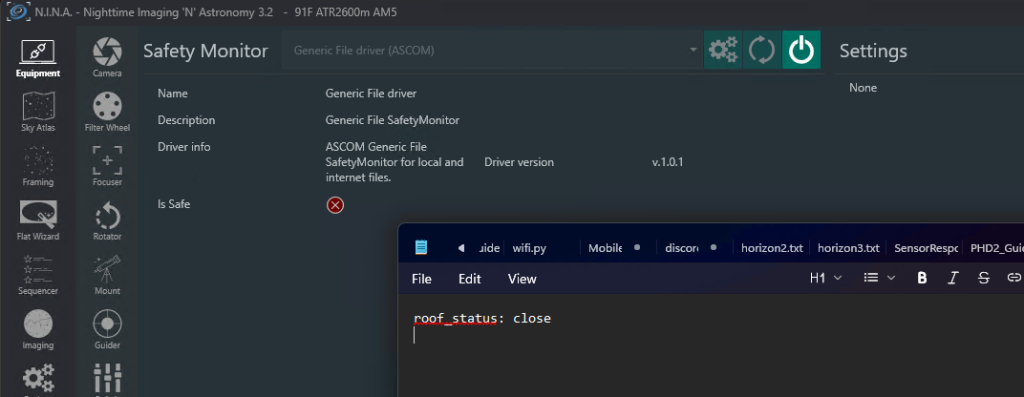
Step 10: Go to N.I.N.A. >> Equipment >> Safety Monitor >> Select “Generic File SafetyMonitor” from the dropdown. If you don’t see it, click the refresh button. If you still don’t see it, restart your NINA and/or reinstall the driver.

Step 11: Click the gear icon to go to the settings:

Step 12: Fill out the form as shown below. Click the “folder” icon on the “Files to Monitor” section and find the roofstatus.txt file (e.g. C:\Users\Naz\Documents\roof\DVO_roof_status\roofstatus.txt) 

Note: The PowerShell script runs every 30s, the interval monitor below is 30s, and there’s an additional 10s delay for “unsafe” to kick in so there’s potentially a 70s delay between roof status change and NINA seeing the update. Change the statuses below as you prefer. 

Statuses:

Closed: 

Open:

Questions? Contact Naz. 

How to Replace the Magnetic Brake and Control board on your MLAstro SAL-33

By Naztronomy • Posted on 6/21/2026 • Updated on 6/22/2026

My MLAstro SAL-33 was cursed and I needed to switch out the magnetic brake and control board. I documented the entire process in this video.

As mentioned in the video, be careful when screwing the bolts back in, don’t overtighten! You don’t want to strip any of the threading.